
Continuous deployment is important for teams that want to be able to deploy new features to customers quickly. Part of this includes automating database releases. This post shows how database changes can be achieved using various technologies, and how these can be executed as part of the continuous deployment lifecycle using Azure DevOps.
Source code for this post can be found here.
Prerequisites
Please ensure you have the below in place before continuing:
- An Azure DevOps account
- A Resource Group needs to be created in Azure either by using the portal or the Azure CLI – For this blog post I have named mine rg-databaseautomation
- Create an Azure SQL database inside the Resource Group – I have provided an ARM template in the codebase and have included this in the Azure DevOps pipeline if you would prefer to use this as part of the deployment
- Create an Azure Resource Manager Service Connection in Azure DevOps that uses the same Azure Subscription as the one where you created the Resource Group in the step above. Follow the steps here for details on how to do this. Give the Service connection a meaningful name, for this demo I am calling it DatabaseAutomationBlogPost
DbUp
TLDR – below explains how and why I first started using DbUp – skip to “Implementing DbUp” if you want to get straight into the action.
I first came across DbUp many years ago during one of my first projects. At the time we were still manually deploying this application into Rackspace, it was taking a lot of time per release to deploy, and DevOps was becoming more prevalent, therefore we decided to automate the process. Automating the deployments for the UI/Service layer/Windows Services was trivial using Octopus deploy, this was around 2013 when we were using TFS 2013, before InRelease was purchased by Microsoft and integrated into TFS and many years before Azure DevOps was released.
For several releases after automating the application deployment we were still pushing database changes manually, using RedGate SQL Compare for schema changes by comparing environments, generating the SQL differences, and then using SSMS to apply the differences, we also used RedGate Data Compare for data changes. This process had several drawbacks which included:
- Requiring developer knowledge of changes for each release and which tables were required for checking data changes
- Manual steps required for releases
- Developer access to all environments including production
- No audit trail of changes applied
- Broken loops in the development lifecycle as database changes weren’t included in source control, therefore harder to review
Due to the above limitations we started to look into automating the database changes. At the time DbUp was one of the tools recommended by the Octopus Deploy team, and by reviewing the documentation it had all of the features we required such as journaling, passing in variables to SQL scripts, ability to use C# code-based scripts or embedding SQL files in the project, as well as how easy it would be to add to our current C# codebase with little developer upskilling required.
We started by scripting out the database in its current state by adding a defensive initial script that was rerunnable to create the database. This allowed every developer to get up and running locally if they wanted too and would mean we could have potentially deleted the dev database as it was no longer needed. Once this script was in place, any change that required database changes were done locally, and then checked in to source control for other developers to run.
As DbUp is added as a NuGet package to an existing C# Console Application, we changed the build to produce and push the artifact to Octopus Deploy. The release for the application was then changed in Octopus to incorporate running the console application to apply the database changes.
Implementing DbUp
First create a new solution called DatabaseReleaseAutomation, and add a C# Console Application called DatabaseReleaseAutomation.DbUpDemo. Next add the dbup-core v4.3.1 and dbup-sqlserver v4.3.1 NuGet packages.
We need the ability to set the connection string for the SQL database, this is important as it will be parameterized during the release process. To use this value, we need to use the ConfigurationBuilder and read the settings via the appsettings.json file. If we were doing this in a real environment, it would be recommended to use something like Azure Key Vault for all sensitive parameters. Add the following nuget packages to allow the use of the ConfigurationBuilder, as well as provide the ability to read the settings in from the appsettings.json file, environment variables and the command line:
- Microsoft.Extensions.Configuration
- Microsoft.Extensions.Configuration.Json
- Microsoft.Extensions.Configuration.EnvironmentVariables
- Microsoft.Extensions.Configuration.CommandLine
Add a new appsettings.json file to the solution, ensure you set the Build Action in the properties to “Embedded resource” and set Copy to Output Directory to “Copy always” for the file otherwise the file won’t be copied into the output when building the application. Add a new value called ConnectionStrings with a child called DbUpSqlConnectionString, setting the connection string to point to your SQL instance as shown below:
| { | |
| "ConnectionStrings": { | |
| "DbUpSqlConnectionString": "Server=127.0.0.1,1589;Database=sqldb-databasereleaseautomation;User Id=sa;Password=YourPassword123;" | |
| } | |
| } |
This next step isn’t required if you have a version of SQL Server installed locally. I have included a docker-compose.yml file in the solution to pull and run SQL Server if you don’t have SQL Server installed locally. Run “docker-compose up” before proceeding to pull and run the image. This will start SQL Server on port 1589.
Now we need to add the code to read the connection string in from our appsettings.json, configure the options for DbUp, and to perform the upgrade. Add the code below to the Program.cs file.
| using DbUp; | |
| using Microsoft.Extensions.Configuration; | |
| using System; | |
| using System.Linq; | |
| using System.Reflection; | |
| namespace DatabaseReleaseAutomation.DbUpDemo | |
| { | |
| class Program | |
| { | |
| static int Main(string[] args) | |
| { | |
| // Loads connection string settings from appsettings.json, environment variables and command line | |
| var configuration = new ConfigurationBuilder() | |
| .AddJsonFile("appsettings.json") | |
| .AddEnvironmentVariables() | |
| .AddCommandLine(args) | |
| .Build(); | |
| // Sets the connection string value from the command line or loaded from app settings | |
| var connectionString = args.FirstOrDefault() ?? configuration.GetConnectionString("DbUpSqlConnectionString"); | |
| // Creates the database if it doesn't already exist | |
| EnsureDatabase.For.SqlDatabase(connectionString); | |
| // Creates the DbUp builder, setting the connection string to use, scripts to apply, and to log output to the console. Can be configured as desired | |
| var upgrader = DeployChanges.To | |
| .SqlDatabase(connectionString) | |
| .WithScriptsEmbeddedInAssembly(Assembly.GetExecutingAssembly()) | |
| .LogToConsole() | |
| .Build(); | |
| // Performs the upgrade as per the configuration and scripts loaded above | |
| var result = upgrader.PerformUpgrade(); | |
| // Determine what to do if the result was unsuccessful | |
| if (!result.Successful) | |
| { | |
| Console.ForegroundColor = ConsoleColor.Red; | |
| Console.WriteLine(result.Error); | |
| Console.ResetColor(); | |
| #if DEBUG | |
| Console.ReadLine(); | |
| #endif | |
| return -1; | |
| } | |
| // Completed update successfully | |
| Console.ForegroundColor = ConsoleColor.Green; | |
| Console.WriteLine("Success!"); | |
| Console.ResetColor(); | |
| return 0; | |
| } | |
| } | |
| } |
We should now be ready to add our migration scripts to our application. The first thing to do is to add a folder called “Scripts” and add a file called “00001-AddCustomerTable.sql”. As with the appsettings.json, we need to set the Build Action in the properties for the file to “Embedded resource”. Inside the file add the following code:
| CREATE TABLE Customers | |
| ( | |
| Id INT IDENTITY(1, 1) PRIMARY KEY, | |
| FirstName varchar(50), | |
| LastName varchar(50) | |
| ) |
Now open a terminal window and navigate to the DatabaseReleaseAutomation.DbUpDemo directory and run “dotnet run”. If you see any errors about a missing appsettings.json file, check the csproj file to ensure there are no similar entries to the below preventing the file from being copied into the output directory:
<ItemGroup>
    <None Remove="appsettings.json" />
</ItemGroup>
Once the console application has executed successfully, you should see the output similar to the screenshot below:
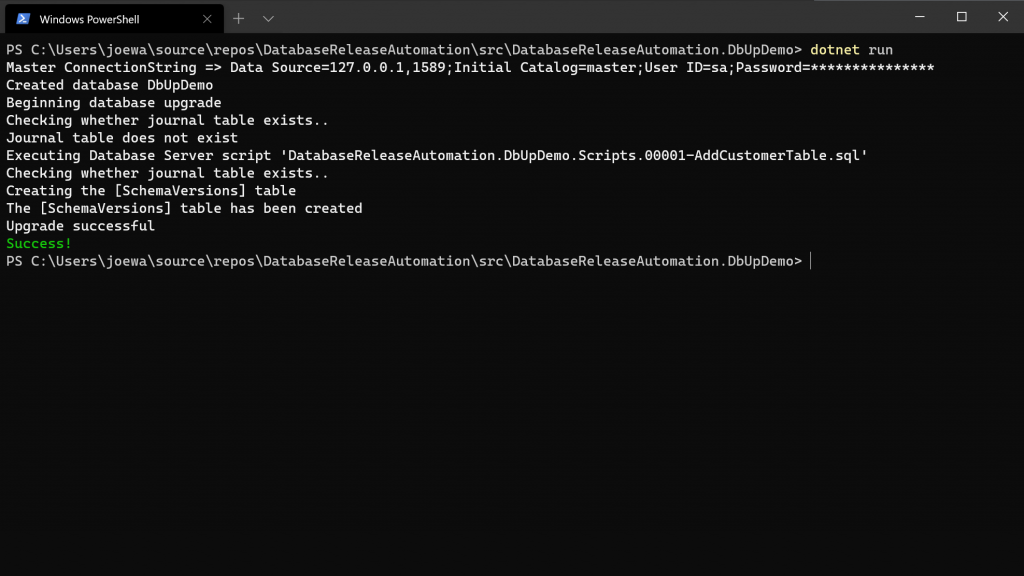
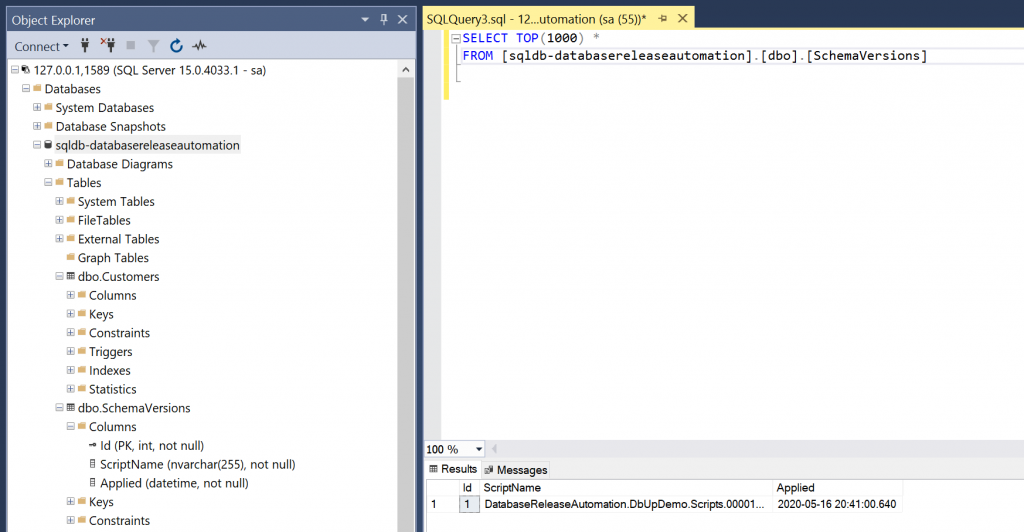
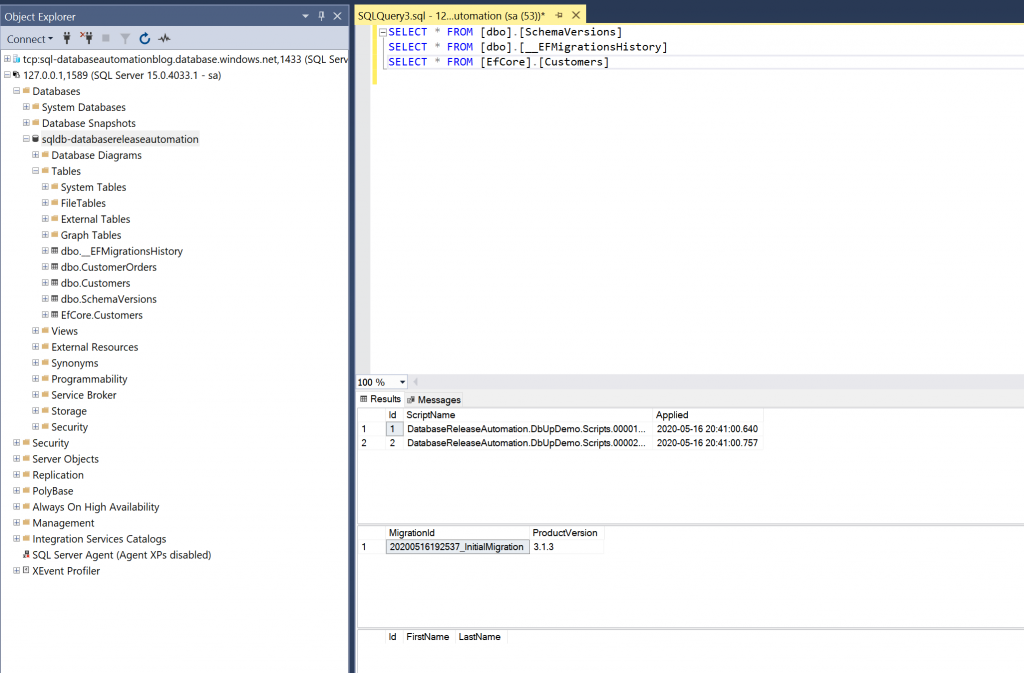
As you can see from the output, the first thing DbUp does is create the database if it does not exist. Next it will check if the journal table exists – this table is used to store the scripts that have run so that it doesn’t rerun the scripts the next time the console application is run. It is also nice to see an audit of what scripts were executed and when they were executed. To view this table, use SSMS to connect to your SQL Instance using the connection string you specified above. You should see the database “sqldb-databasereleaseautomation”, when expanding the tables you should see dbo.Customers and dbo.SchemaVersions.
To show how this would work if we needed to modify the Customers table, and to add a new table CustomerOrders referencing the Custom table, add a new script to the Scripts folder called 00002-AddCustomerOrderTable.sql – remember to change the Build Action. Add the following SQL:
| ALTER TABLE Customers ADD AddressLine1 VARCHAR(255); | |
| ALTER TABLE Customers ADD AddressLine2 VARCHAR(255); | |
| ALTER TABLE Customers ADD AddressLine3 VARCHAR(255); | |
| ALTER TABLE Customers ADD Postcode VARCHAR(9); | |
| GO; | |
| INSERT INTO Customers (FirstName, LastName, AddressLine1, AddressLine2, AddressLine3, Postcode) | |
| VALUES ('Joe', 'Washington', 'AddressLine1', 'AddressLine2', 'AddressLine3', 'Postcode'); | |
| Go; | |
| CREATE TABLE CustomerOrders | |
| ( | |
| Id INT IDENTITY(1, 1) PRIMARY KEY, | |
| CustomerId INT FOREIGN KEY REFERENCES Customers(Id), | |
| OrderDate DATETIME | |
| ); | |
| Go; |
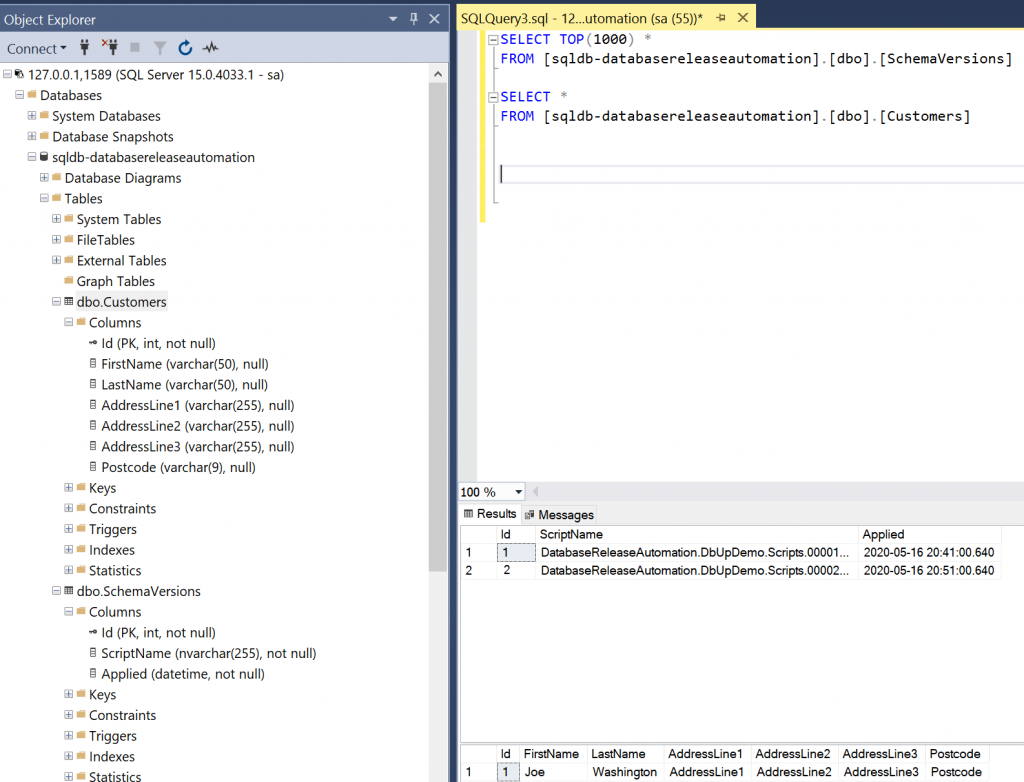
Execute the “dotnet run” command again, and view the newly created table in SSMS, along with the new columns and populated data in the Customers table:
Deploying to Azure using Azure DevOps
The code needs to be committed and pushed to your git code repository in Azure DevOps or GitHub before continuing. Now we are going to add an Azure DevOps pipeline to build and deploy the code to Azure. There are a few ways to do this:
- Create the yml file manually and edit
- Create the yml file within Azure DevOps in the pipeline section. This is pretty cool as it gives you a nice UI to select the tasks you are interested in and renders the expected inputs. The yml is then automatically generated for you – we are going to go with this option
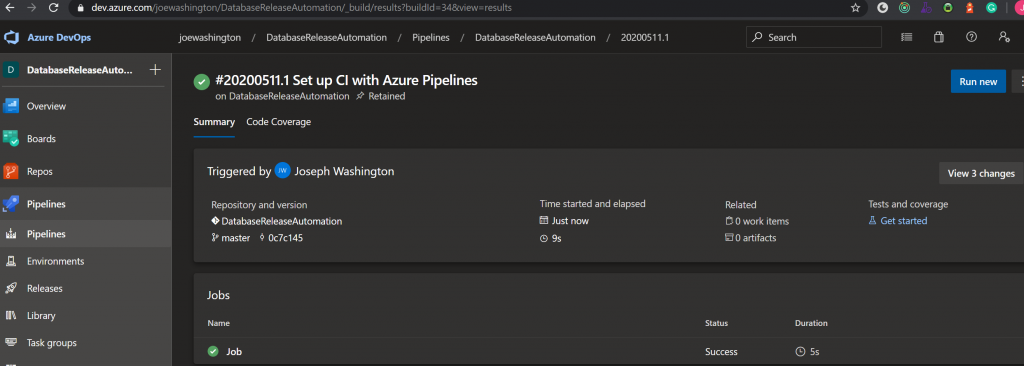
Navigate to Pipelines in Azure DevOps and click Create Pipeline. You will then be presented with a screen to select where your code is hosted. If using GitHub, you will be asked to grant access to your repository to Azure DevOps. On the configure screen select Starter pipeline, and change the name at the top to save as /cicd/azure-pipelines-dbup.yml, then click Save and run and commit to master. The build will instantly run, and you should see the number of changes (commits) that are being included in the build. Below is an example showing what you should see once the job is complete:
Before modifying the yml file to include our deployment steps, we first need to add some build variables – these will be passed to our ARM template during deployment. In Azure DevOps, when the pipeline is in edit mode, click the Variables button in the top right corner as highlighted below:

We need to add four new variables:
- AdministratorLogin – insert a username for the SQL Admin – you can mark this as a secret value
- AdministratorLoginPassword – insert a password for the SQL Admin use – you can mark this as a secret value
- SqlServerName – This is the name the instance of SQL Server will be created with in Azure. Our ARM template prepends “sql-“ to the name
- ConnectionString.DbUpSqlConnectionString – This will be the connection string of the Azure SQL Server. This will be used in the File Transform step to modify the appsettings.json to point to our Azure SQL Server. It should look like “Server=tcp:sql-‘SqlServerName’.database.windows.net,1433;Initial Catalog= sqldb-databasereleaseautomation;Persist Security Info=False;User ID=’AdministratorLogin’;Password=’AdministratorLoginPassword’;MultipleActiveResultSets=False;Encrypt=True;TrustServerCertificate=False;Connection Timeout=30;”. You can mark this as a secret value
In a real-world situation we wouldn’t have these variables included in the pipeline, they would be in Key Vault.
Now we are going to modify the yml file to include two stages. One stage for building the solution and producing the required artifacts for deployment, and another for deploying into Azure. The code below shows the final output for that needs to be copied in to the /cicd/azure-pipelines-dbup.yml file:
| # Starter pipeline | |
| # Start with a minimal pipeline that you can customize to build and deploy your code. | |
| # Add steps that build, run tests, deploy, and more: | |
| # https://aka.ms/yaml | |
| trigger: | |
| - master | |
| pool: | |
| vmImage: 'ubuntu-latest' | |
| stages: | |
| - stage: BuildDbUp | |
| displayName: Build and publish DbUp | |
| jobs: | |
| - job: BuildDbUpProject | |
| displayName: Build and Publish DbUp Project | |
| steps: | |
| - task: DotNetCoreCLI@2 | |
| displayName: Publish DbUp Project | |
| inputs: | |
| command: 'publish' | |
| publishWebProjects: false | |
| projects: '**/*DbUpDemo.csproj' | |
| arguments: '--configuration Release --output $(Build.ArtifactStagingDirectory)' | |
| - task: PublishBuildArtifacts@1 | |
| displayName: Publish DbUp Artifact | |
| inputs: | |
| pathtoPublish: '$(Build.ArtifactStagingDirectory)' | |
| artifactName: 'DbUpDemo' | |
| - job: PublishARM | |
| displayName: Publish ARM Template | |
| steps: | |
| - task: PublishBuildArtifacts@1 | |
| displayName: Publish DbUp Artifact | |
| inputs: | |
| pathtoPublish: 'src/DatabaseReleaseAutomation.Infrastructure' | |
| artifactName: 'DatabaseReleaseAutomation.Infrastructure' | |
| - stage: DeployARMAndDbUp | |
| displayName: Deploy ARM and DbUp | |
| dependsOn: BuildDbUp | |
| jobs: | |
| - job: DeployInfrastructure | |
| displayName: Deploy Infrastructure | |
| steps: | |
| - task: DownloadBuildArtifacts@0 | |
| displayName: Download Infrastructure Artifact | |
| inputs: | |
| buildType: 'current' | |
| downloadType: 'single' | |
| artifactName: 'DatabaseReleaseAutomation.Infrastructure' | |
| downloadPath: '$(System.ArtifactsDirectory)' | |
| #Ensure you add the required variables below before running | |
| - task: AzureResourceManagerTemplateDeployment@3 | |
| displayName: Execute ARM template to create infrastructure | |
| inputs: | |
| deploymentScope: 'Resource Group' | |
| azureResourceManagerConnection: 'DatabaseAutomationBlogPost' | |
| subscriptionId: '38c15d6f-362a-4c30-9cd2-f1b3d8e1c38e' | |
| action: 'Create Or Update Resource Group' | |
| resourceGroupName: 'rg-databaseautomation' | |
| location: 'UK South' | |
| templateLocation: 'Linked artifact' | |
| csmFile: '$(System.ArtifactsDirectory)/DatabaseReleaseAutomation.Infrastructure/SQLDatabase.json' | |
| overrideParameters: '-administratorLogin "$(AdministratorLogin)" -administratorLoginPassword "$(AdministratorLoginPassword)" -sqlserverName $(SqlServerName) -databaseName databasereleaseautomation' | |
| deploymentMode: 'Incremental' | |
| - job: DeployDbUp | |
| displayName: Deploy DbUp Changes | |
| dependsOn: DeployInfrastructure | |
| steps: | |
| - task: DownloadBuildArtifacts@0 | |
| displayName: Download DbUpDemo artifact | |
| inputs: | |
| buildType: 'current' | |
| downloadType: 'single' | |
| artifactName: 'DbUpDemo' | |
| downloadPath: '$(System.ArtifactsDirectory)/DbUpDemoExtract' | |
| - task: ExtractFiles@1 | |
| displayName: Extract Zip | |
| inputs: | |
| archiveFilePatterns: '$(System.ArtifactsDirectory)/**/*.zip' | |
| destinationFolder: '$(System.ArtifactsDirectory)/DbUpDemoExtract' | |
| cleanDestinationFolder: false | |
| - task: FileTransform@2 | |
| displayName: Transform variables in appsettings.json | |
| inputs: | |
| folderPath: '$(System.ArtifactsDirectory)/DbUpDemoExtract' | |
| xmlTransformationRules: | |
| jsonTargetFiles: 'appsettings.json' | |
| - task: DotNetCoreCLI@2 | |
| displayName: Run DbUp | |
| inputs: | |
| command: 'custom' | |
| custom: 'DatabaseReleaseAutomation.DbUpDemo.dll' | |
| workingDirectory: '$(System.ArtifactsDirectory)/DbUpDemoExtract' |
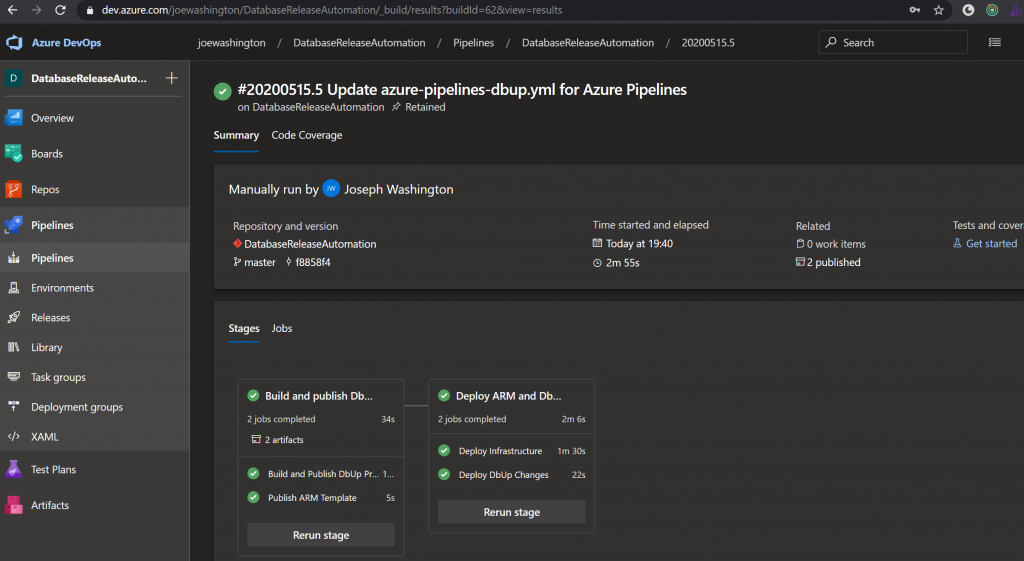
Committing the changes above will trigger the build. You should see the following results in Azure DevOps once complete:
We can check that the SQL Scripts have been applied by viewing the logs of the DbUp Step as shown in the diagram below:

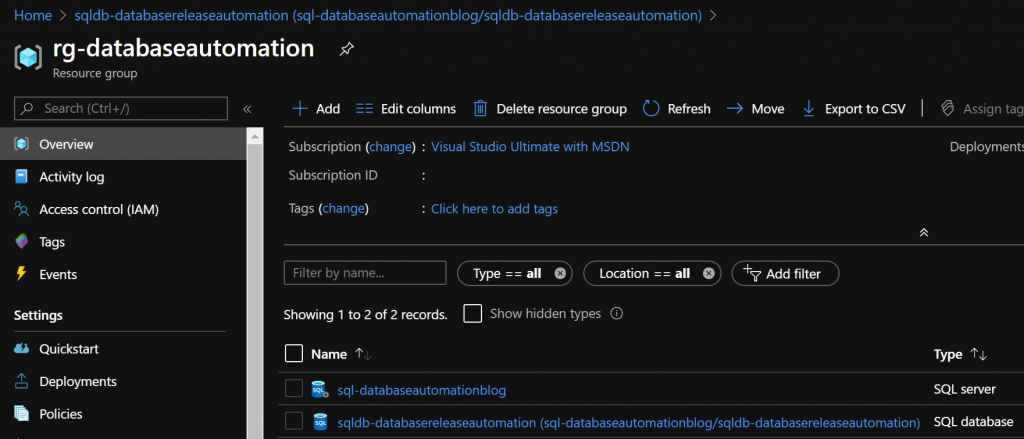
If we log in to the Azure Portal and navigate to our Resource Group, we should see the following resources created:
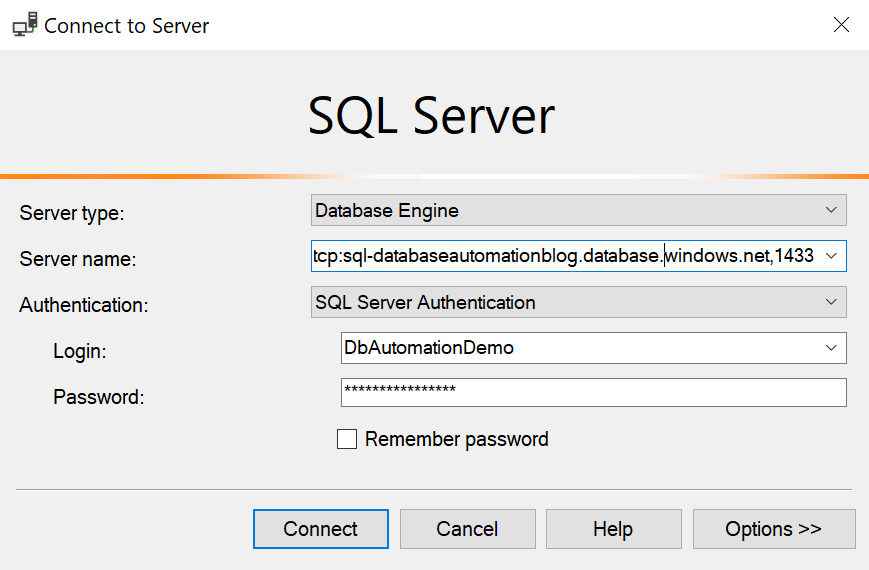
Next open SSMS or another SQL client and connect to the Azure SQL Database. You can either use the connection string from memory above or navigate to the database in the Azure portal and click “Show database connection strings”. See the screenshot below for an example using SSMS:
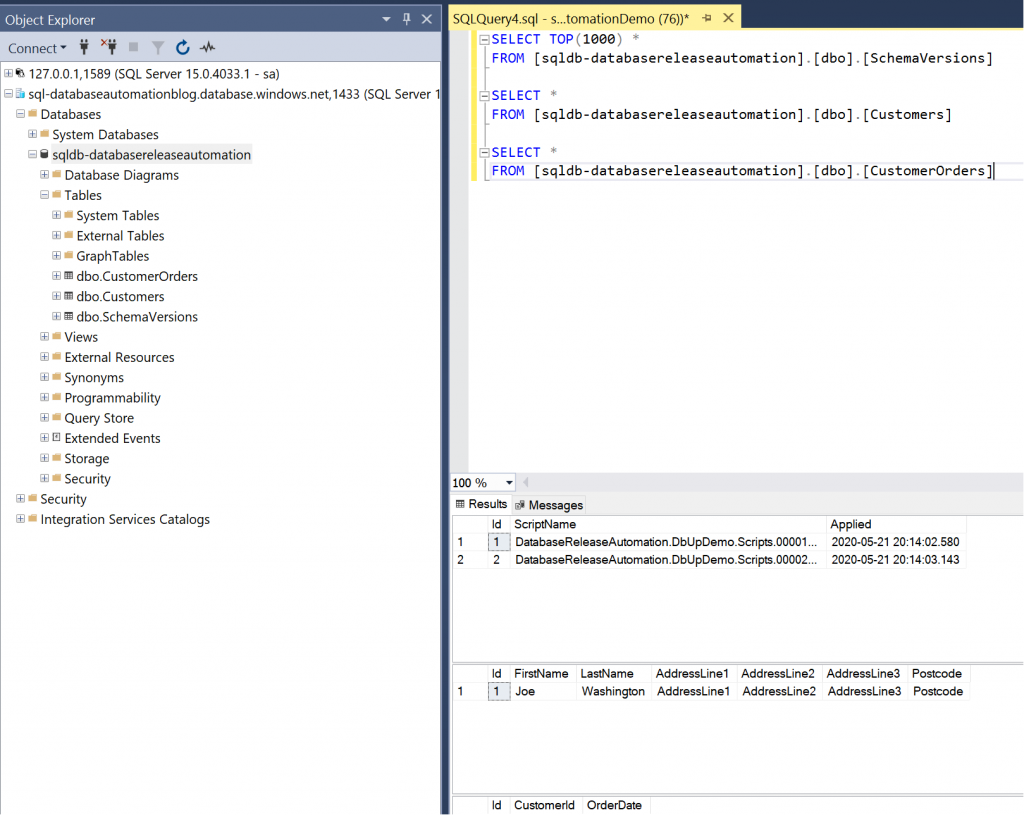
A prompt should appear after clicking Connect asking you to sign in to the Azure Portal, and to add your IP address to the SQL Database firewall exceptions. Sign in and click OK. Once you are in you should be able to see the created database, the three tables, and the seeded data as shown below:
We have now successfully deployed a SQL Database into Azure and run our migrations all from DevOps.
Entity Framework Core
Like DbUp, Entity Framework takes a migration-based approach, generating incremental scripts as changes to the database are made.
In one of my previous posts I explained how to separate EF Core Migrations out into an independent project, therefore I won’t repeat the steps here from a coding perspective. To simplify this post and to make it easier to view all the code in one place, I have copied the code into the same repo as the DbUp code above, and have:
- Changed the objects so they are named the same as the DbUp scripts e.g. Person and all references to Person have changed to Customer, the Address property and configuration is commented out so that we can add another migration to show incremental changes
- Changed the connection string in the appsettings.json in EFCoreSeparateProject.Migrations.csproj to use the port and password specified in the docker-compose file – feel free to point this at any instance of SQL Server you would like to test with
- Set the default schema to EfCore
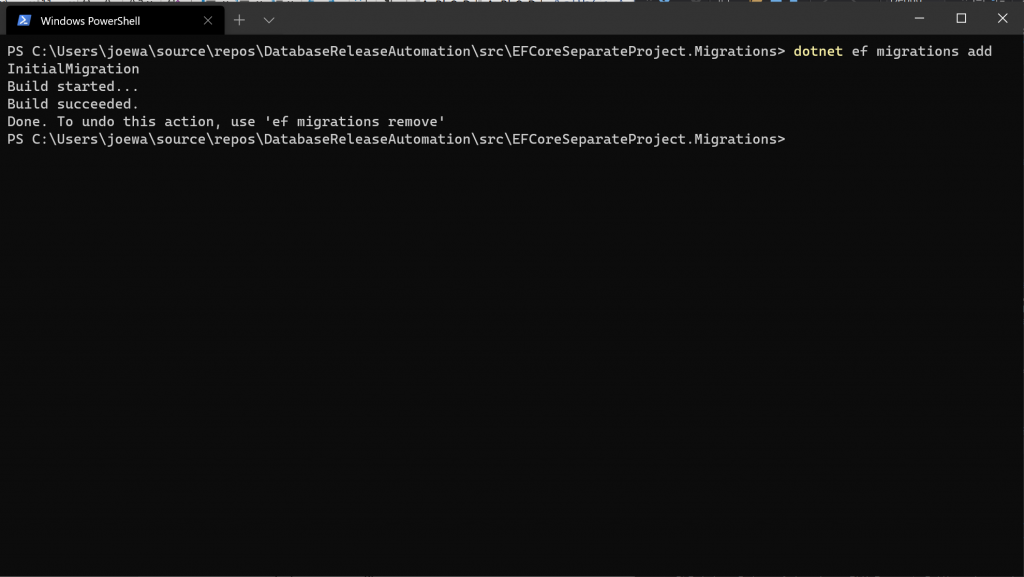
- Regenerated the initial migration script using “dotnet migrations add InitialMigration”
| using Microsoft.EntityFrameworkCore.Migrations; | |
| namespace EFCoreSeparateProject.Migrations.Migrations | |
| { | |
| public partial class InitialMigration : Migration | |
| { | |
| protected override void Up(MigrationBuilder migrationBuilder) | |
| { | |
| migrationBuilder.EnsureSchema( | |
| name: "EfCore"); | |
| migrationBuilder.CreateTable( | |
| name: "Customers", | |
| schema: "EfCore", | |
| columns: table => new | |
| { | |
| Id = table.Column<int>(nullable: false) | |
| .Annotation("SqlServer:Identity", "1, 1"), | |
| FirstName = table.Column<string>(nullable: true), | |
| LastName = table.Column<string>(nullable: true), | |
| AddressLine1 = table.Column<string>(nullable: true), | |
| AddressLine2 = table.Column<string>(nullable: true), | |
| Postcode = table.Column<string>(nullable: true) | |
| }, | |
| constraints: table => | |
| { | |
| table.PrimaryKey("PK_Customers", x => x.Id); | |
| }); | |
| } | |
| protected override void Down(MigrationBuilder migrationBuilder) | |
| { | |
| migrationBuilder.DropTable( | |
| name: "Customers", | |
| schema: "EfCore"); | |
| } | |
| } | |
| } |
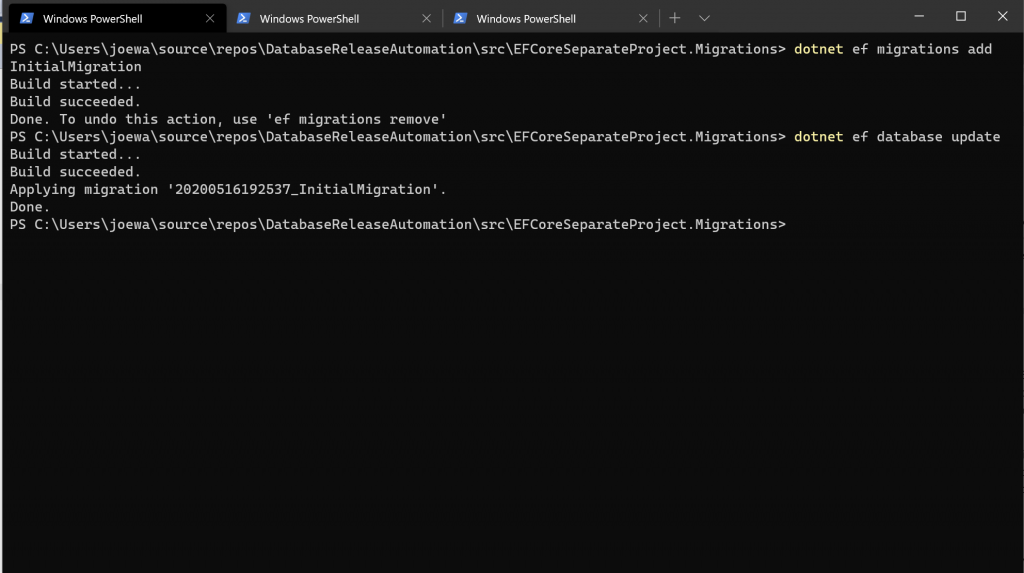
Now apply the migration and view the database. As you can see from the below images, two extra tables have been added:
- dbo.__EFMigrationsHistory
- EfCore.Customers
As you can see from the below image the dbo.__EFMigrationsHistory table is very similar to the dbo.SchemaVersions table used by DbUp to track the scripts that have been applied.
Now we are going to add a new migration to include the address information for the Customer and add the ability to store Customer Orders.
- Uncomment the Address property in Customer and uncomment the configuration for the Address property in CustomerConfiguration.
- Add a new class called Order.cs and add a DateTime property called OrderDate
- Add a List<Order> property to Customer.cs
- Modify the ExampleDbContext.cs class to include the property DbSet<Order> CustomerOrders
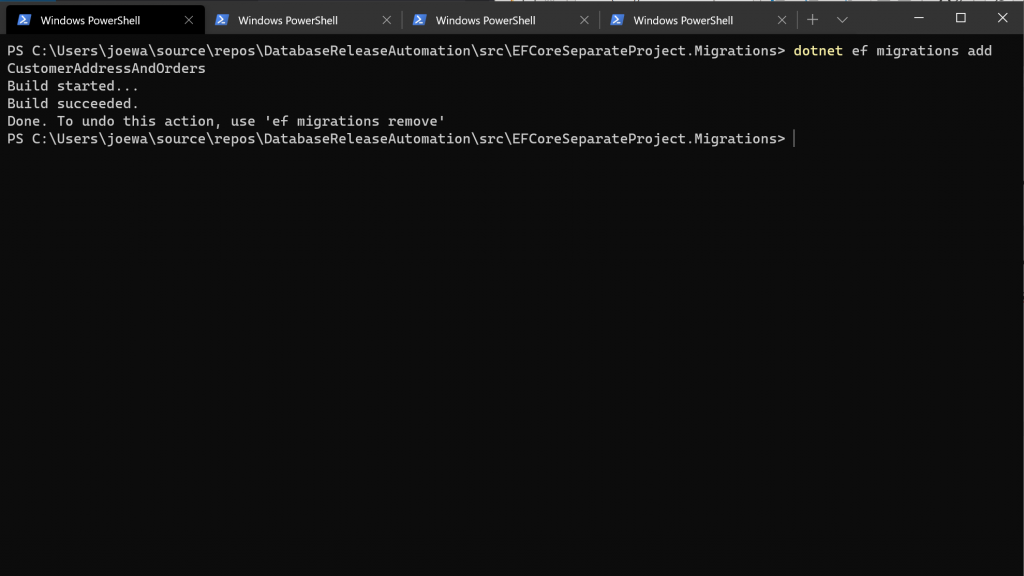
We are now going to add another migration “dotnet ef migrations add CustomerAddressAndOrders”:
| using System; | |
| using Microsoft.EntityFrameworkCore.Migrations; | |
| namespace EFCoreSeparateProject.Migrations.Migrations | |
| { | |
| public partial class CustomerAddressAndOrders : Migration | |
| { | |
| protected override void Up(MigrationBuilder migrationBuilder) | |
| { | |
| migrationBuilder.CreateTable( | |
| name: "CustomerOrders", | |
| schema: "EfCore", | |
| columns: table => new | |
| { | |
| Id = table.Column<int>(nullable: false) | |
| .Annotation("SqlServer:Identity", "1, 1"), | |
| OrderDate = table.Column<DateTime>(nullable: false), | |
| CustomerId = table.Column<int>(nullable: true) | |
| }, | |
| constraints: table => | |
| { | |
| table.PrimaryKey("PK_CustomerOrders", x => x.Id); | |
| table.ForeignKey( | |
| name: "FK_CustomerOrders_Customers_CustomerId", | |
| column: x => x.CustomerId, | |
| principalSchema: "EfCore", | |
| principalTable: "Customers", | |
| principalColumn: "Id", | |
| onDelete: ReferentialAction.Restrict); | |
| }); | |
| migrationBuilder.CreateIndex( | |
| name: "IX_CustomerOrders_CustomerId", | |
| schema: "EfCore", | |
| table: "CustomerOrders", | |
| column: "CustomerId"); | |
| } | |
| protected override void Down(MigrationBuilder migrationBuilder) | |
| { | |
| migrationBuilder.DropTable( | |
| name: "CustomerOrders", | |
| schema: "EfCore"); | |
| } | |
| } | |
| } |
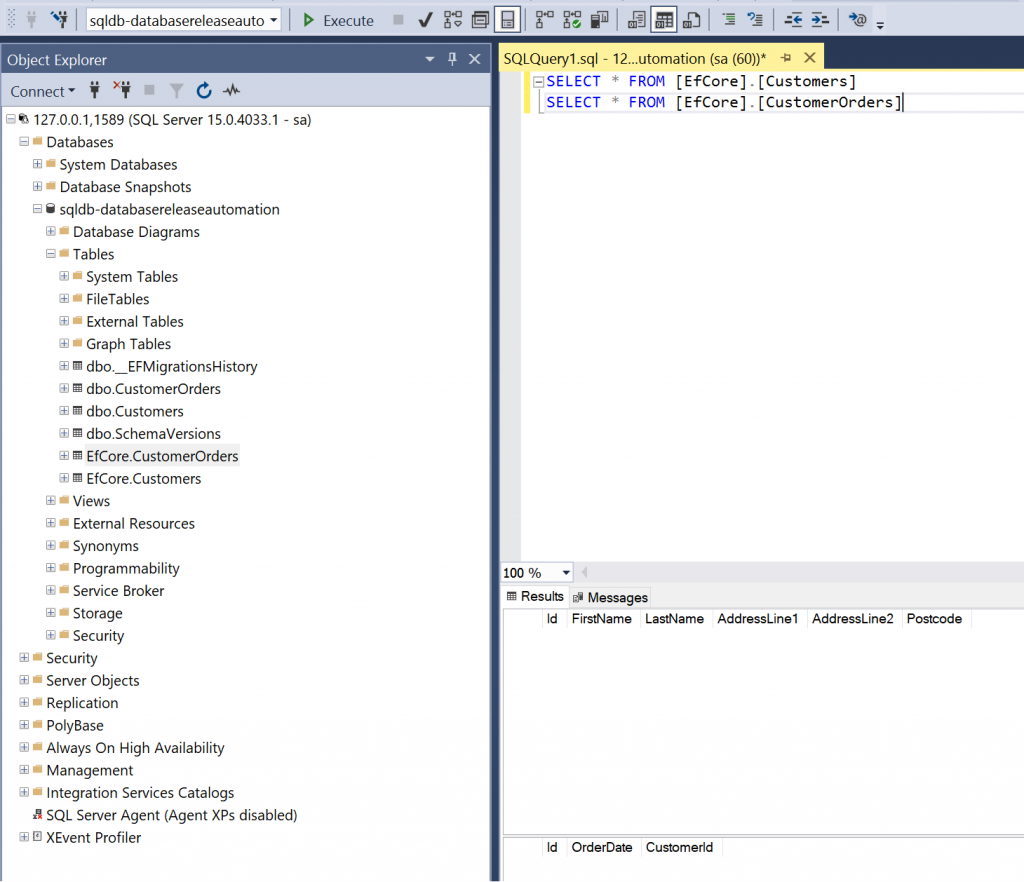
Run the migration “dotnet ef database update” and check the database in SSMS. You should see the Customer table has been modified to include the new columns and a new table EfCore.CustomerOrders has been added:
Deployment options using Entity Framework Core
There are a number of options available for deploying EF Migrations:
- Use dotnet ef tools to produce SQL script for migrations and apply the script using DevOps – The Azure DevOps SqlAzureDacpacDeployment@1 task only works on a Windows agent, and this process might be different to your development workflows
- Run dotnet exec to run the migrations using the ef.dll – difficult to set up and is not documented extensively
- Copy the source code in to the release step and run “dotnet ef database update” – not ideal as it Is running against the source code rather than the published output
- Running migrations on app start-up – This can slow down the loading of the application on first load when deployed
This article is going to show options 1 and 2.
It is possible to see the SQL script that Entity Framework Core produces locally for option 1 by running “dotnet ef migrations script -o Migrations\migrations.sql -i”. This will produce a migrations.sql file containing all of our migrations. The -i (idempotent) argument is important as it ensures the scripts are rerunnable. There are a number of other arguments available, such as producing a SQL script per migration, please see the Microsoft documentation for further information. The code example below as an example of the SQL produced:
| IF OBJECT_ID(N'[__EFMigrationsHistory]') IS NULL | |
| BEGIN | |
| CREATE TABLE [__EFMigrationsHistory] ( | |
| [MigrationId] nvarchar(150) NOT NULL, | |
| [ProductVersion] nvarchar(32) NOT NULL, | |
| CONSTRAINT [PK___EFMigrationsHistory] PRIMARY KEY ([MigrationId]) | |
| ); | |
| END; | |
| GO | |
| IF NOT EXISTS(SELECT * FROM [__EFMigrationsHistory] WHERE [MigrationId] = N'20200521183957_InitialMigration') | |
| BEGIN | |
| IF SCHEMA_ID(N'EfCore') IS NULL EXEC(N'CREATE SCHEMA [EfCore];'); | |
| END; | |
| GO | |
| IF NOT EXISTS(SELECT * FROM [__EFMigrationsHistory] WHERE [MigrationId] = N'20200521183957_InitialMigration') | |
| BEGIN | |
| CREATE TABLE [EfCore].[Customers] ( | |
| [Id] int NOT NULL IDENTITY, | |
| [FirstName] nvarchar(max) NULL, | |
| [LastName] nvarchar(max) NULL, | |
| [AddressLine1] nvarchar(max) NULL, | |
| [AddressLine2] nvarchar(max) NULL, | |
| [Postcode] nvarchar(max) NULL, | |
| CONSTRAINT [PK_Customers] PRIMARY KEY ([Id]) | |
| ); | |
| END; | |
| GO | |
| IF NOT EXISTS(SELECT * FROM [__EFMigrationsHistory] WHERE [MigrationId] = N'20200521183957_InitialMigration') | |
| BEGIN | |
| INSERT INTO [__EFMigrationsHistory] ([MigrationId], [ProductVersion]) | |
| VALUES (N'20200521183957_InitialMigration', N'3.1.3'); | |
| END; | |
| GO | |
| IF NOT EXISTS(SELECT * FROM [__EFMigrationsHistory] WHERE [MigrationId] = N'20200521184035_CustomerAddressAndOrders') | |
| BEGIN | |
| CREATE TABLE [EfCore].[CustomerOrders] ( | |
| [Id] int NOT NULL IDENTITY, | |
| [OrderDate] datetime2 NOT NULL, | |
| [CustomerId] int NULL, | |
| CONSTRAINT [PK_CustomerOrders] PRIMARY KEY ([Id]), | |
| CONSTRAINT [FK_CustomerOrders_Customers_CustomerId] FOREIGN KEY ([CustomerId]) REFERENCES [EfCore].[Customers] ([Id]) ON DELETE NO ACTION | |
| ); | |
| END; | |
| GO | |
| IF NOT EXISTS(SELECT * FROM [__EFMigrationsHistory] WHERE [MigrationId] = N'20200521184035_CustomerAddressAndOrders') | |
| BEGIN | |
| CREATE INDEX [IX_CustomerOrders_CustomerId] ON [EfCore].[CustomerOrders] ([CustomerId]); | |
| END; | |
| GO | |
| IF NOT EXISTS(SELECT * FROM [__EFMigrationsHistory] WHERE [MigrationId] = N'20200521184035_CustomerAddressAndOrders') | |
| BEGIN | |
| INSERT INTO [__EFMigrationsHistory] ([MigrationId], [ProductVersion]) | |
| VALUES (N'20200521184035_CustomerAddressAndOrders', N'3.1.3'); | |
| END; | |
| GO | |
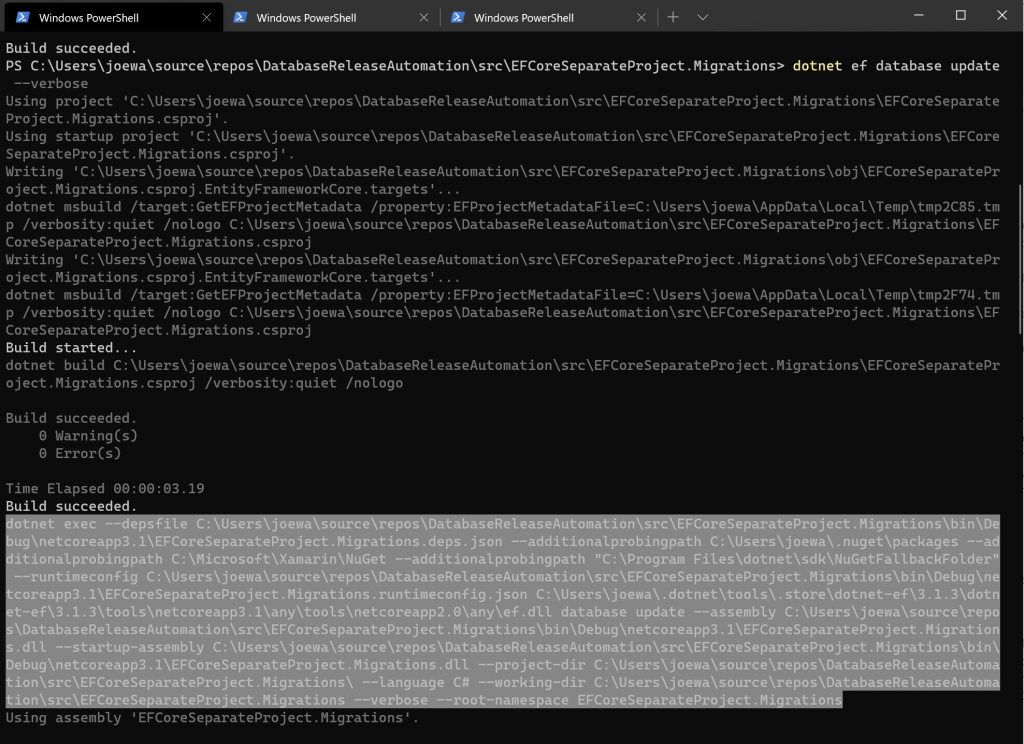
As mentioned above, there isn’t a lot of documentation available for the dotnet exec command when running migrations. To see an example of the command used by the dotnet ef tools, we can run the “dotnet ef database update –verbose” command as shown below:
Using the above, we are now ready to implement the Azure DevOps pipeline for options 1 and 2.
Deploying to Azure using Azure DevOps
For simplicity, rather than creating a separate template to publish and deploy the ARM template and referencing from the /cicd/azure-pipelines-dbup.yml and the new template we are going to produce, or duplicating the steps mentioned to do this, we are going to assume the Azure SQL database instance already exists. We are also assuming the code has already been checked in to Azure DevOps.
For Option 1 described previously, using EF Core tools to produce a SQL Script, add a new pipeline in Azure DevOps called /cicd/azure-pipelines-efcore-option-1.yml. The first thing we need to do is add a variable called “ConnectionStrings.SqlConnectionString” and set this to the connection string of your Azure SQL database. Ensure this variable is marked as a secret variable. As mentioned above, we are going to be using the Azure DevOps SqlAzureDacpacDeployment@1 task which only works on windows, therefore we need to set vmImage to use a Windows agent. In this case set it too “windows-latest”.
We are now going to add two stages with several jobs:
- Build and publish the EF migration script as an artifact
- Specify dotnet version
- Install dotnet-ef tool
- Check the dotnet-ef version to ensure it installed correctly
- Run the dotnet-ef migration command to produce the SQL script
- Publish the SQL script artifact to be used in the next stage
- Take the artifact produced and deploy to Azure SQL
- Download the artifact produced in step 1.e.
- Run the SQL script against the Azure SQL instance
Copy the below code in to the pipeline and save to run:
| # Starter pipeline | |
| # Start with a minimal pipeline that you can customize to build and deploy your code. | |
| # Add steps that build, run tests, deploy, and more: | |
| # https://aka.ms/yaml | |
| trigger: | |
| - master | |
| pool: | |
| vmImage: 'windows-latest' | |
| stages: | |
| - stage: BuildEFCoreMigrations | |
| displayName: Build and publish EF Core Migrations | |
| jobs: | |
| - job: BuildEFCoreMigrationProject | |
| displayName: Build and Publish EF Core Migration Project | |
| steps: | |
| - task: UseDotNet@2 | |
| displayName: Specify dotnet version to use | |
| inputs: | |
| version: '3.1.200' | |
| - task: DotNetCoreCLI@2 | |
| displayName: Install dotnet-ef tools | |
| inputs: | |
| command: 'custom' | |
| custom: 'tool' | |
| arguments: 'install --global dotnet-ef' | |
| - task: DotNetCoreCLI@2 | |
| displayName: Check dotnet-ef version to ensure installed successfully | |
| inputs: | |
| command: 'custom' | |
| custom: 'ef' | |
| arguments: '--version' | |
| - task: DotNetCoreCLI@2 | |
| displayName: Produce SQL Script from EF Core Migrations | |
| inputs: | |
| command: 'custom' | |
| custom: 'ef' | |
| arguments: 'migrations script -p $(Build.SourcesDirectory)/src/EFCoreSeparateProject.Migrations/EFCoreSeparateProject.Migrations.csproj -o $(Build.ArtifactStagingDirectory)/Migrations/migrations.sql -i' | |
| - task: PublishBuildArtifacts@1 | |
| displayName: Publish EFCore Migration Artifact | |
| inputs: | |
| PathtoPublish: '$(Build.ArtifactStagingDirectory)/Migrations/migrations.sql' | |
| ArtifactName: 'EFCoreMigrations' | |
| publishLocation: 'Container' | |
| - stage: DeployEFCoreMigrations | |
| displayName: Deploy EF Core Migrations | |
| dependsOn: BuildEFCoreMigrations | |
| jobs: | |
| - job: DeployEFCoreMigrations | |
| displayName: Deploy EF Core Migration Changes | |
| steps: | |
| - task: DownloadBuildArtifacts@0 | |
| displayName: Download EFCoreMigrations artifact | |
| inputs: | |
| buildType: 'current' | |
| downloadType: 'single' | |
| artifactName: 'EFCoreMigrations' | |
| downloadPath: '$(System.ArtifactsDirectory)' | |
| - task: SqlAzureDacpacDeployment@1 | |
| displayName: Run migration script | |
| inputs: | |
| azureSubscription: 'DatabaseAutomationBlogPost' | |
| AuthenticationType: 'connectionString' | |
| ConnectionString: '$(ConnectionStrings.SqlConnectionString)' | |
| deployType: 'SqlTask' | |
| SqlFile: '$(System.ArtifactsDirectory)/EFCoreMigrations/migrations.sql' | |
| IpDetectionMethod: 'AutoDetect' |
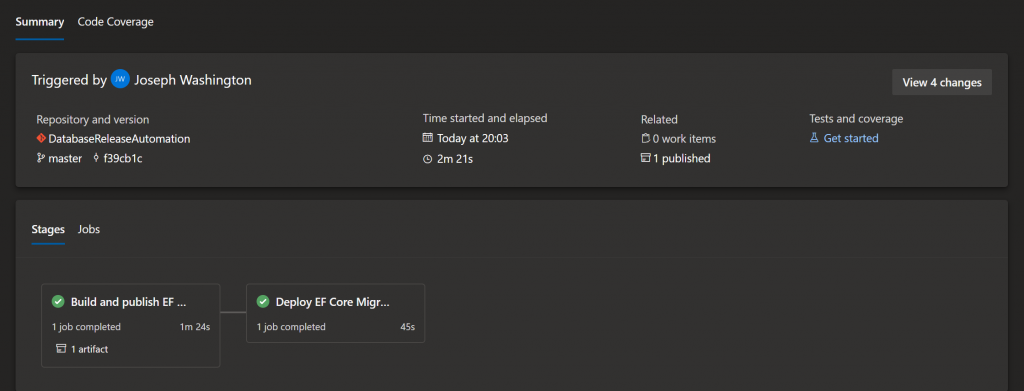
When the pipeline has completed you should see a screen similar to the one below:
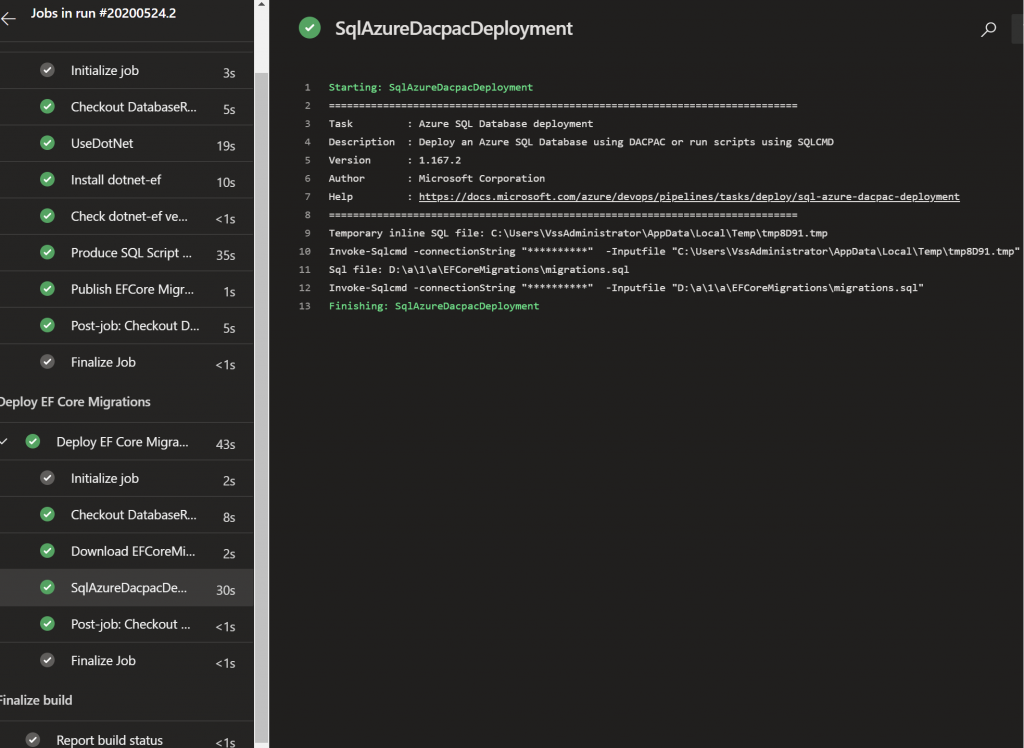
By clicking the stages you can click in and see the jobs and tasks. To view the migration scripts that were run, click the DACPAC task and you should be presented with a screen similar to the below:
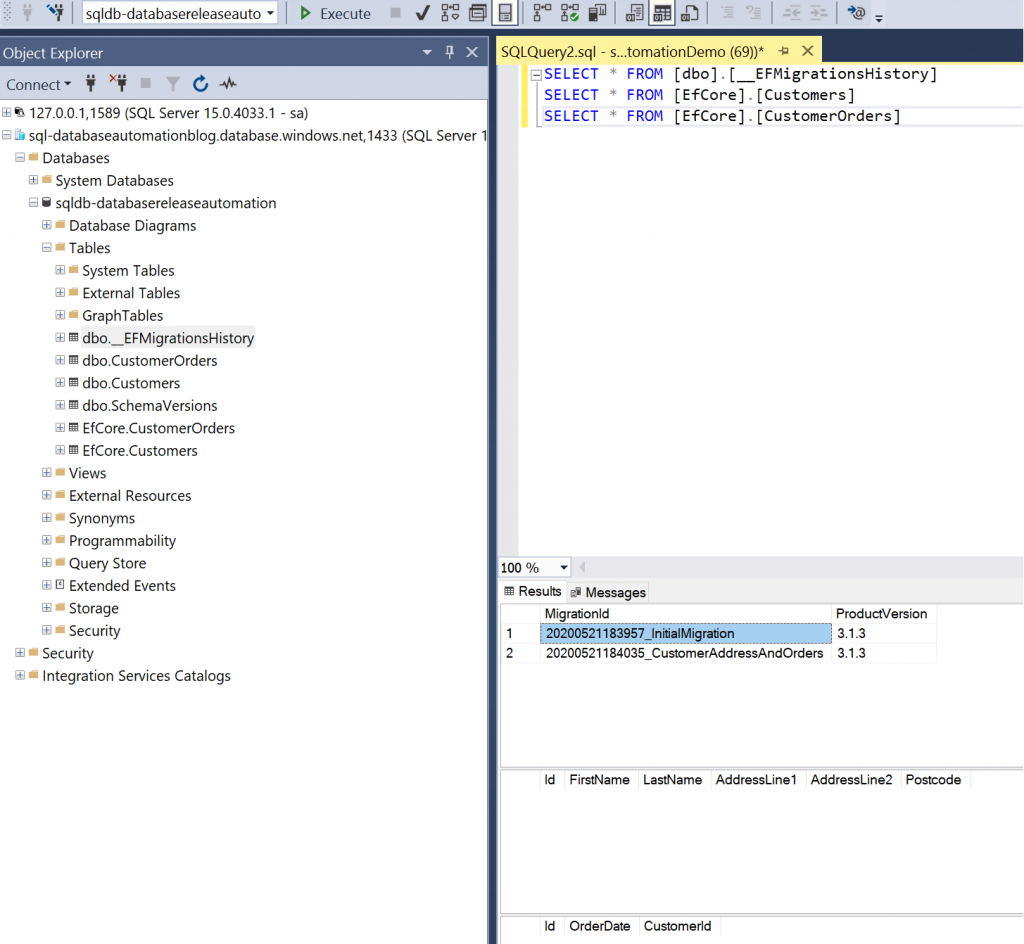
Now the pipeline has completed successfully, login to the Azure SQL instance via SSMS. You should see the dbo.__EFMigrationsHistory, EfCore.Customers, and EfCore.CustomerOrders tables:
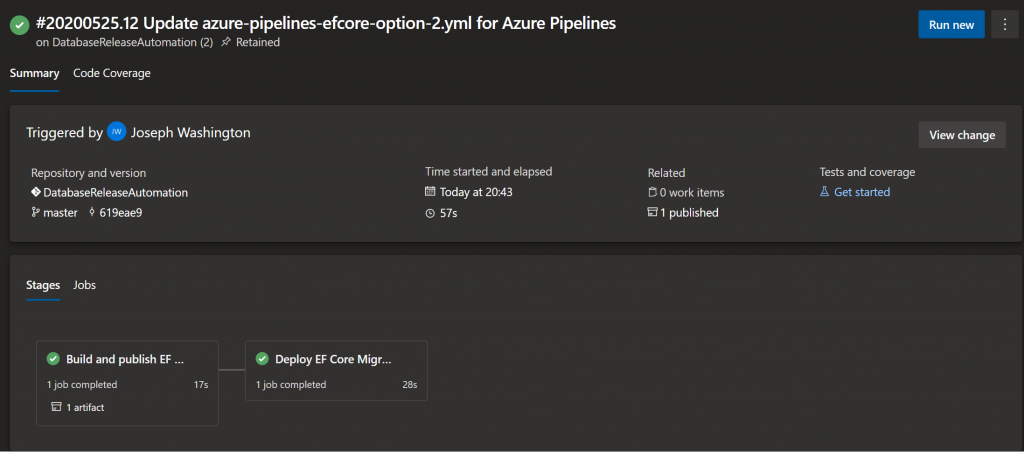
For Option 2 described previously, using dotnet exec on the published output of the migrations project add a new pipeline in Azure DevOps called /cicd/azure-pipelines-efcore-option-2.yml. Again, we need to add a variable called “ConnectionStrings.SqlConnectionString” and set this to the connection string of your Azure SQL database. Ensure this is marked as a secret variable. We are now going to add two stages with several jobs:
- Publish the EFCoreSeparateProject.Migrations project
- Dotnet publish on the EFCoreSeparateProject.Migrations.csproj
- Publish the published output from the above task as an artifact to be used in the next stage
- Take the published artifact produced and deploy to Azure SQL
- Download the artifact
- Extract the zipped artifact
- Transform the appsettings.json using the variables specified for the pipeline
- Specify the dotnet version to use
- Install the dotnet-ef core tools
- Check the version of the dotnet-ef core tools
- Run the migrations
Copy the below code in to the pipeline and save to run:
| # Starter pipeline | |
| # Start with a minimal pipeline that you can customize to build and deploy your code. | |
| # Add steps that build, run tests, deploy, and more: | |
| # https://aka.ms/yaml | |
| trigger: | |
| - master | |
| pool: | |
| vmImage: 'ubuntu-latest' | |
| stages: | |
| - stage: BuildEFCoreMigrations | |
| displayName: Build and publish EF Core Migrations | |
| jobs: | |
| - job: BuildEFCoreMigrationProject | |
| displayName: Build and Publish EF Core Migration Project | |
| steps: | |
| - task: DotNetCoreCLI@2 | |
| inputs: | |
| command: 'publish' | |
| publishWebProjects: false | |
| projects: '**/EFCoreSeparateProject.Migrations.csproj' | |
| arguments: '--configuration Release --output $(Build.ArtifactStagingDirectory)' | |
| #- task: ArchiveFiles@2 | |
| # inputs: | |
| # rootFolderOrFile: '$(Build.SourcesDirectory)/src' | |
| # includeRootFolder: true | |
| # archiveType: 'zip' | |
| # archiveFile: '$(Build.ArtifactStagingDirectory)/Test.zip' | |
| # replaceExistingArchive: true | |
| - task: PublishBuildArtifacts@1 | |
| displayName: Publish EFCore Migration Artifact | |
| inputs: | |
| pathtoPublish: '$(Build.ArtifactStagingDirectory)' | |
| ArtifactName: 'EFCoreMigrations' | |
| publishLocation: 'Container' | |
| - stage: DeployEFCoreMigrations | |
| displayName: Deploy EF Core Migrations | |
| dependsOn: BuildEFCoreMigrations | |
| jobs: | |
| - job: DeployEFCoreMigrations | |
| displayName: Deploy EF Core Migration Changes | |
| steps: | |
| - task: DownloadBuildArtifacts@0 | |
| displayName: Download EFCoreMigrations artifact | |
| inputs: | |
| buildType: 'current' | |
| downloadType: 'single' | |
| artifactName: 'EFCoreMigrations' | |
| downloadPath: '$(System.ArtifactsDirectory)' | |
| - task: ExtractFiles@1 | |
| displayName: Extract Zip | |
| inputs: | |
| archiveFilePatterns: '$(System.ArtifactsDirectory)/**/*.zip' | |
| destinationFolder: '$(System.ArtifactsDirectory)/EFCoreMigrations' | |
| cleanDestinationFolder: false | |
| #- task: ExtractFiles@1 | |
| # displayName: Extract Zip | |
| # inputs: | |
| # archiveFilePatterns: '$(System.ArtifactsDirectory)/**/Test.zip' | |
| # destinationFolder: '$(System.ArtifactsDirectory)/TestEFCoreMigrations' | |
| # cleanDestinationFolder: false | |
| - task: FileTransform@2 | |
| displayName: Transform variables in appsettings.json | |
| inputs: | |
| folderPath: '$(System.ArtifactsDirectory)/EFCoreMigrations' | |
| xmlTransformationRules: | |
| jsonTargetFiles: 'appsettings.json' | |
| - task: UseDotNet@2 | |
| inputs: | |
| version: '3.1.200' | |
| - task: DotNetCoreCLI@2 | |
| displayName: Install dotnet-ef | |
| inputs: | |
| command: 'custom' | |
| custom: 'tool' | |
| arguments: 'install --global dotnet-ef' | |
| - task: DotNetCoreCLI@2 | |
| displayName: Check dotnet-ef version | |
| inputs: | |
| command: 'custom' | |
| custom: 'ef' | |
| arguments: '--version' | |
| #- task: DotNetCoreCLI@2 | |
| # displayName: Run EF Migrations | |
| # inputs: | |
| # command: 'custom' | |
| # custom: 'ef' | |
| # arguments: 'database update --verbose' | |
| # workingDirectory: '$(System.ArtifactsDirectory)/TestEFCoreMigrations/src/EFCoreSeparateProject.Migrations' | |
| - task: DotNetCoreCLI@2 | |
| displayName: Run EF Migrations | |
| inputs: | |
| command: 'custom' | |
| custom: 'exec' | |
| arguments: '--depsfile EFCoreSeparateProject.Migrations.deps.json --additionalprobingpath /home/vsts/.nuget/packages --runtimeconfig EFCoreSeparateProject.Migrations.runtimeconfig.json /home/vsts/.dotnet/tools/.store/dotnet-ef/3.1.4/dotnet-ef/3.1.4/tools/netcoreapp3.1/any/tools/netcoreapp2.0/any/ef.dll database update --assembly EFCoreSeparateProject.Migrations.dll --startup-assembly EFCoreSeparateProject.Migrations.dll --language C# --verbose --root-namespace EFCoreSeparateProject.Migrations' | |
| workingDirectory: '$(System.ArtifactsDirectory)/EFCoreMigrations' |
I have included the commented tasks that helped me determine what the dotnet exec command should be for reference in case this helps anyone in the future.
When the pipeline has completed you should see a screen similar to the one below:
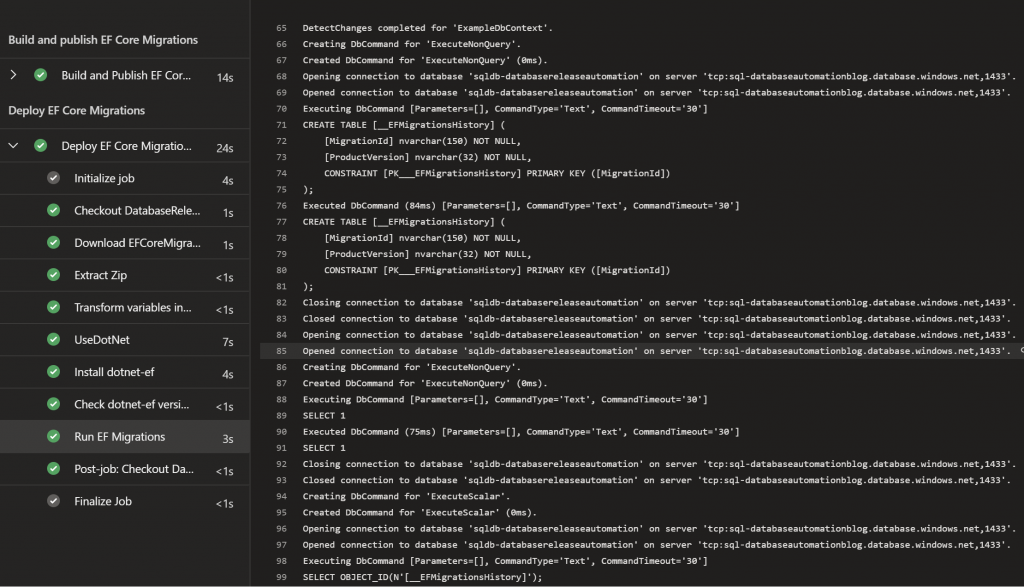
By clicking the stages you can click in and see the jobs and tasks. To view the migrations that were run, click the Run EF Migrations task and you should be presented with a screen similar to the below listing the migrations that were run, scroll down to view all tables that were created:
You can now log in to your Azure SQL instance and view the same tables that were created for Option 1 – dbo.__EFMigrationsHistory, EfCore.Customers, and EfCore.CustomerOrders.
SQL Server Data Tools
Coming soon…